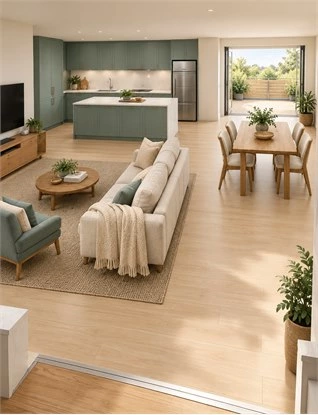
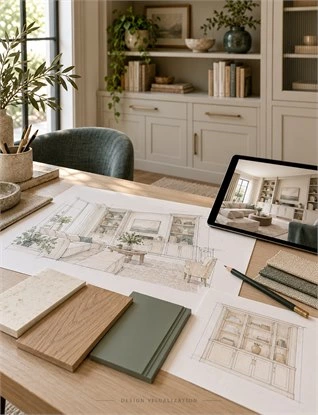
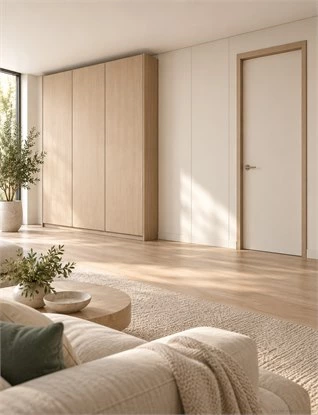
Cabinetry for open-plan living should be planned around the kitchen, dining area, and lounge together. Start with activities, retained furniture,e and the routes connecting them, then give each storage location a clear job. Related proportions and finishes can connect the interior while cabinet configurations remain specific to their tasks.
A kitchen arrangement can look convincing in isolation yet leave dining storage difficult to reach or lounge belongings without a useful home. Assess the public area as one working space before deciding how much cabinetry to add or where to concentrate it.
This guide maps storage tasks, checks occupied use, and compares two strategies for the same illustrative room. A published mountain-view residence provides a separate spatial reference. Use the tables and proposed views to prepare a brief; actual dimensions, product requirements,s and site conditions must support the final design.
Start with the Whole Living Area, Not One Cabinet Wall
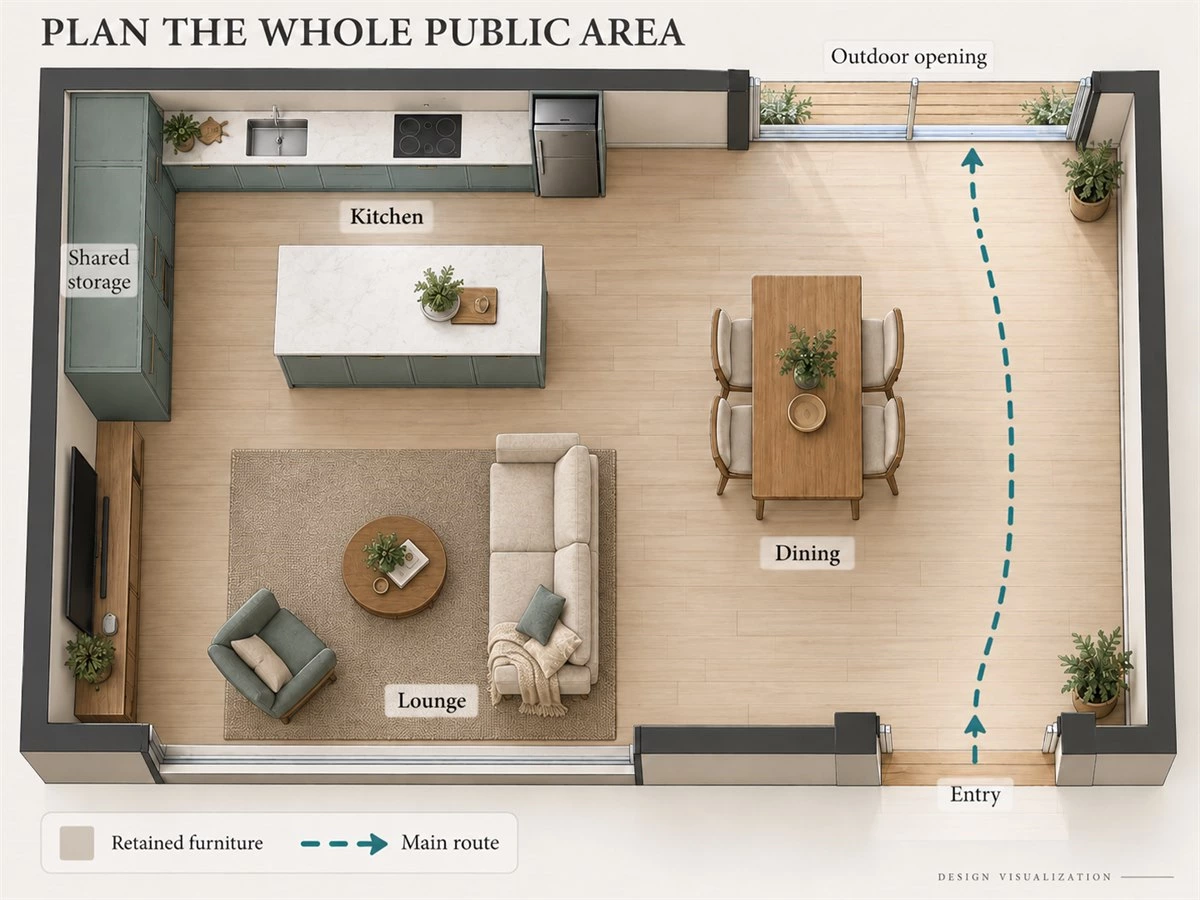
Begin with a public-area plan that includes the kitchen, dining and lounge functions together. Cabinet choices become easier to assess when the drawing also shows the activities and furniture they must support.
Map the Kitchen, Dining Area and Lounge Together
Mark equipment, tables, seating, doors, windows and relevant fixed conditions. Identify the route to adjoining rooms and outdoor access. Distinguish what will stay from what is proposed, so the design does not quietly rely on moving an existing opening or replacing useful furniture.
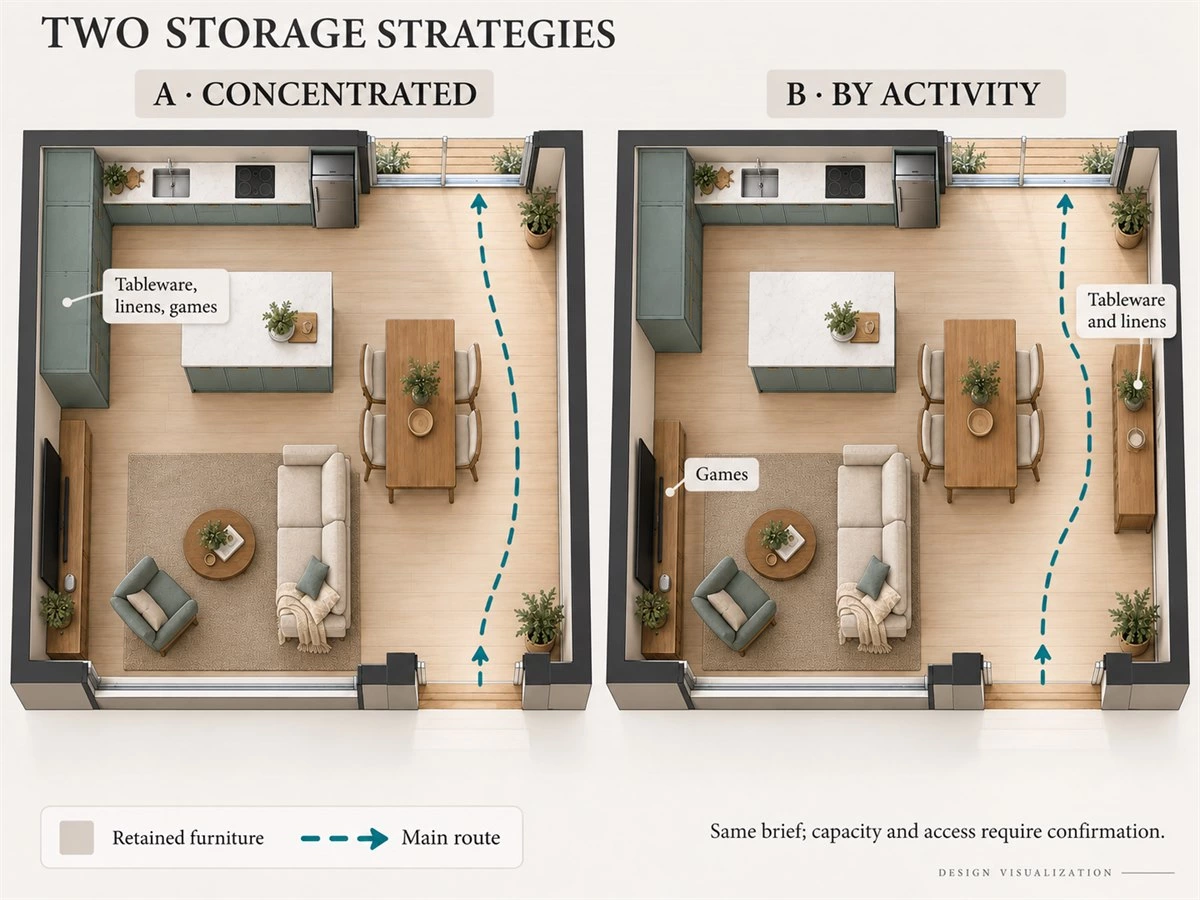
In the illustrative room used here, the kitchen occupies the rear-left area, dining sits toward the center-right, and the lounge occupies the front-left. The entrance is near the front-right, with an outdoor opening at the rear-right. These are shared assumptions for a planning exercise, not a measured project or a reconstruction of the case discussed later.
Record Activities That Happen at the Same Time
Consider cooking while someone retrieves a drink, serving dinner while another person passes through, or watching television during meal preparation. List which combinations happen often and where they compete for the same space. A route used by guests may need different consideration from a cook’s movement between equipment and preparation.
Name the household’s priorities rather than assuming everyone entertains or cooks in the same way. Visual openness does not settle noise, odors, or conflicting activities. Those wider requirements should be addressed alongside the cabinetry brief where relevant.
Include the Furniture You Will Keep
Record the actual sofa, armchair, dining table and chairs, including table extensions and occupied positions. Place them in the plan before allocating more floor area to cabinetry. A cabinet that fits an empty wall may not work beside the furniture that gives the room its purpose.
The comparison later in this guide retains one sofa, one armchair, and a four-seat dining set in both layouts. Keep their size and positions consistent when testing storage alternatives. Do not make one proposal appear better by removing a chair or shrinking a retained piece.
Give Each Cabinet Zone a Clear Job
Useful open-plan living storage follows belongings and activities. Decide where each group of items is used, who retrieves it and how often, then assign an accessible location rather than repeating the same mixed storage in every zone.
Keep Cooking Storage Connected to Preparation and Equipment
Assign cookware, utensils, food, a nd cleaning items to the kitchen tasks they support. Separate frequently accessed items from occasional storage. Then consider whether another person retrieving shared belongings would need to pass through that working area.
For example, placing every drinking glass beside food preparation may be convenient for one user but draw other household members into the same active location. Test the actual routine before adding a separate drinks position; duplication needs a purpose as well as available capacity.
Locate Dining and Drinks Storage Where It Is Used
List tableware, serving pieces, linens, and drinks-related items. Compare keeping them within the kitchen with placing selected items near the dining table. Evaluate the journey during serving and clearing, and the access available when people are seated.
A sideboard can be useful when it answers a dining task without obstructing another activity. Additional island compartments may be less convenient if they open behind stools or face away from the table. The better position depends on the room and belongings, not the cabinet label.
Define the Lounge’s Storage and Equipment Needs
List books, games, media accessories, and household items that repeatedly arrive near the seating. Distinguish display objects from things that need an easy closed-storage location. Include the actual devices and how their connections or replaceable parts will be reached.
Integrated living room storage should serve those tasks as well as the room’s appearance. A large TV setup with nowhere convenient for games or chargers can leave the coffee table doing the storage work. More cabinet frontage does not automatically resolve that mismatch.
Decide What Can Be Shared and What Should Stay Separate
Shared storage is useful when different users can reach it conveniently. It is less useful when everyday access repeatedly interrupts another task. Keep cooking-specific items close to their activity while considering whether drinks, linens, o r household supplies benefit from a more neutral access point.
| Task | Cabinet or furniture location | Who uses it? | Access point | Opening / route impact | Cross-zone relationship |
|---|---|---|---|---|---|
| Food preparation | Kitchen drawers and cupboards | Household cooks | Kitchen working side | Check equipment and working movement | Keep general household access distinguishable |
| Serving meals | Kitchen-adjacent storage or dining sideboard | Servers and diners | Assigned dining access | Check occupied chairs and fronts | Compare distance to kitchen and table |
| Retrieving drinks | Selected kitchen or dining location | Household and guests | Defined shared position | Check entry into active preparation | Avoid adding a duplicate without a task |
| Media and games | Media unit or assigned closed storage | Lounge users | Near seating or shared bank | Check furniture and service access | Separate equipment needs from general clutter |
Use the brief to identify gaps before selecting accessories. The aim is a complete allocation of the inventory, with any shared location chosen deliberately. Do not assume that every zone needs the same cabinet type or internal arrangement.
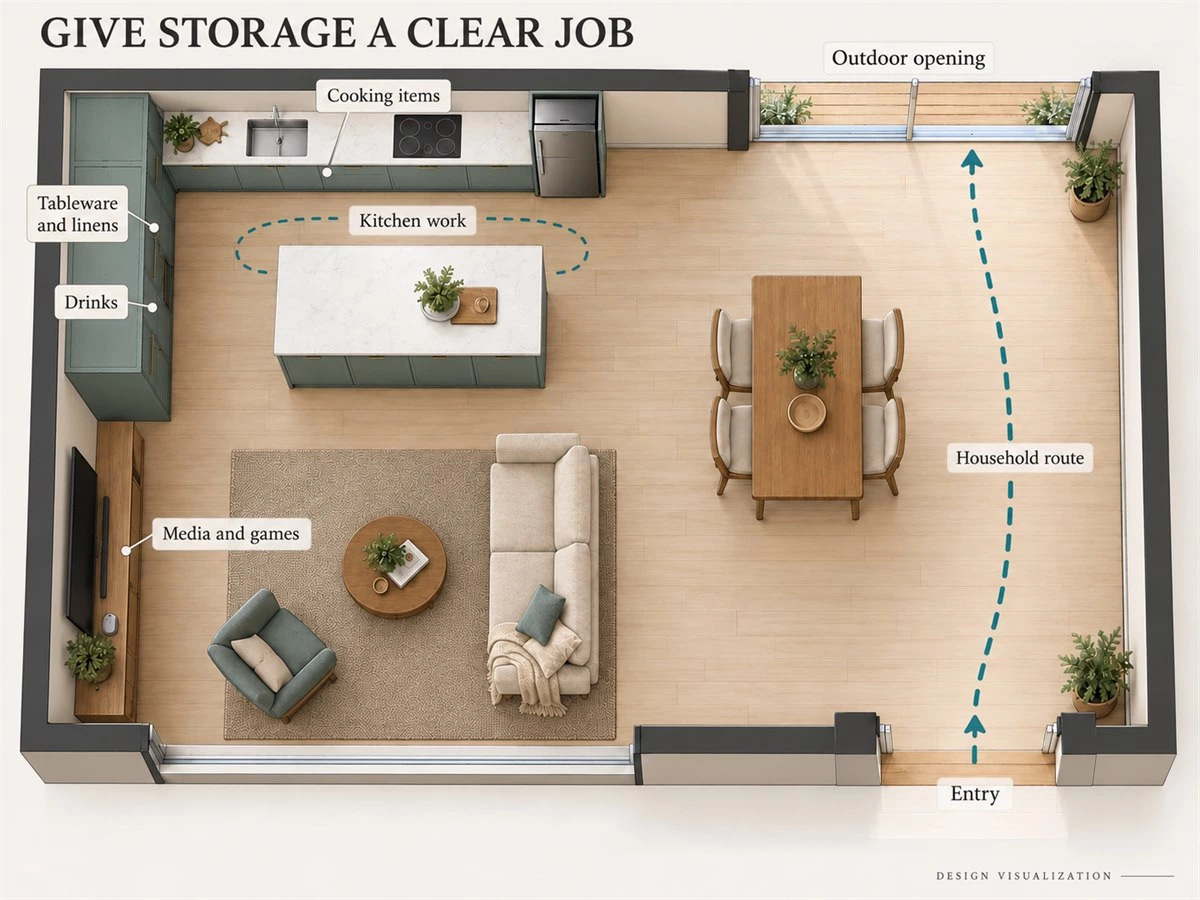
Coordinate Islands, Dining Furniture and Living-Room Storage
The island, dining set, a nd lounge storage should be assessed as neighboring elements. Giving one of them too many jobs can make the rest of the shared area harder to arrange.
Decide What the Island Actually Needs to Do
Identify its priority: preparation, storage, casual seating or another agreed activity. Add functions only after checking their effect on surrounding use. A social edge, work area and access to drawers may compete for the same side of the island.
For kitchen-led examples, see the open kitchen diner design guide. In this whole-area exercise, the island remains a preparation and storage element so that the main dining set and lounge can be evaluated in their own right.
Compare Island Seating with the Main Dining Arrangement
Ask whether casual seating and the dining table serve different routines. If both are wanted, draw both in use. If the existing table already handles everyday meals and conversation, test a preparation-focused island rather than assuming another seating row is essential.
Also compare a layout without a large central island where the room or routine suggests it. That is an option to assess, not a recommendation to remove useful workspace. Keep the required preparation and storage tasks visible in every alternative.
Relate the Dining Cabinet to the Media Wall
Review their locations, visual weight, and access together. A substantial dining cabinet and a large media wall can dominate different views of the same room. Decide whether storage should read as one concentrated composition or several smaller task-related elements.
Check how people reach each unit. A convenient dining location may still conflict with a route to the sofa or outdoor opening. Judge the combination using the complete plan and connected views, rather than approving each elevation independently.
Consider an Arrangement Without a Central Storage Divider
Test furniture orientation and wall-side storage before inserting another unit between activities. In the illustrative room, no central divider is assumed. The sofa, table, and storage locations establish the activities while leaving their connections open for assessment.
A divider earns consideration when it provides a needed function. Use the room divider cabinet guide for the specific form and two-sided brief. Do not add one simply because the room is open or a reference image contains one.
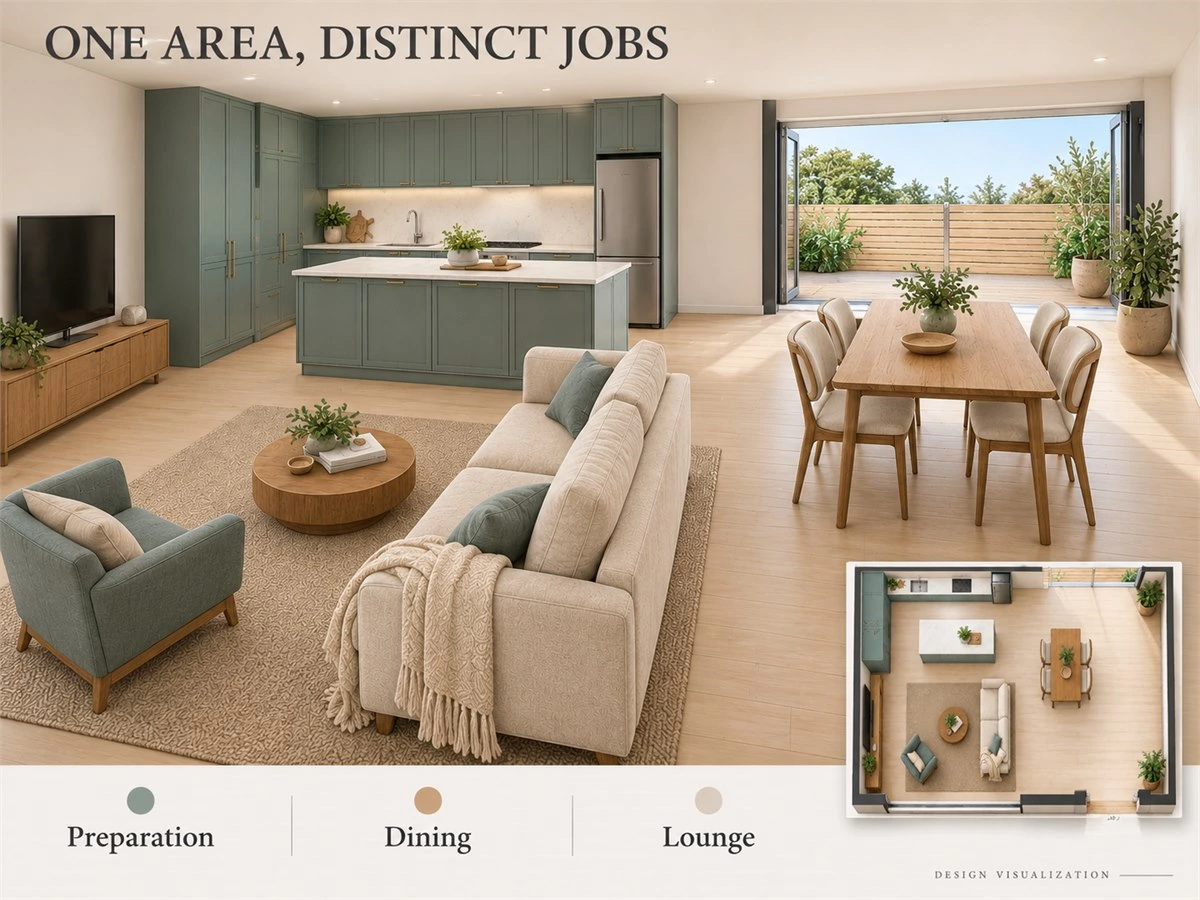
Check Routes with People, Chairs and Doors in Use
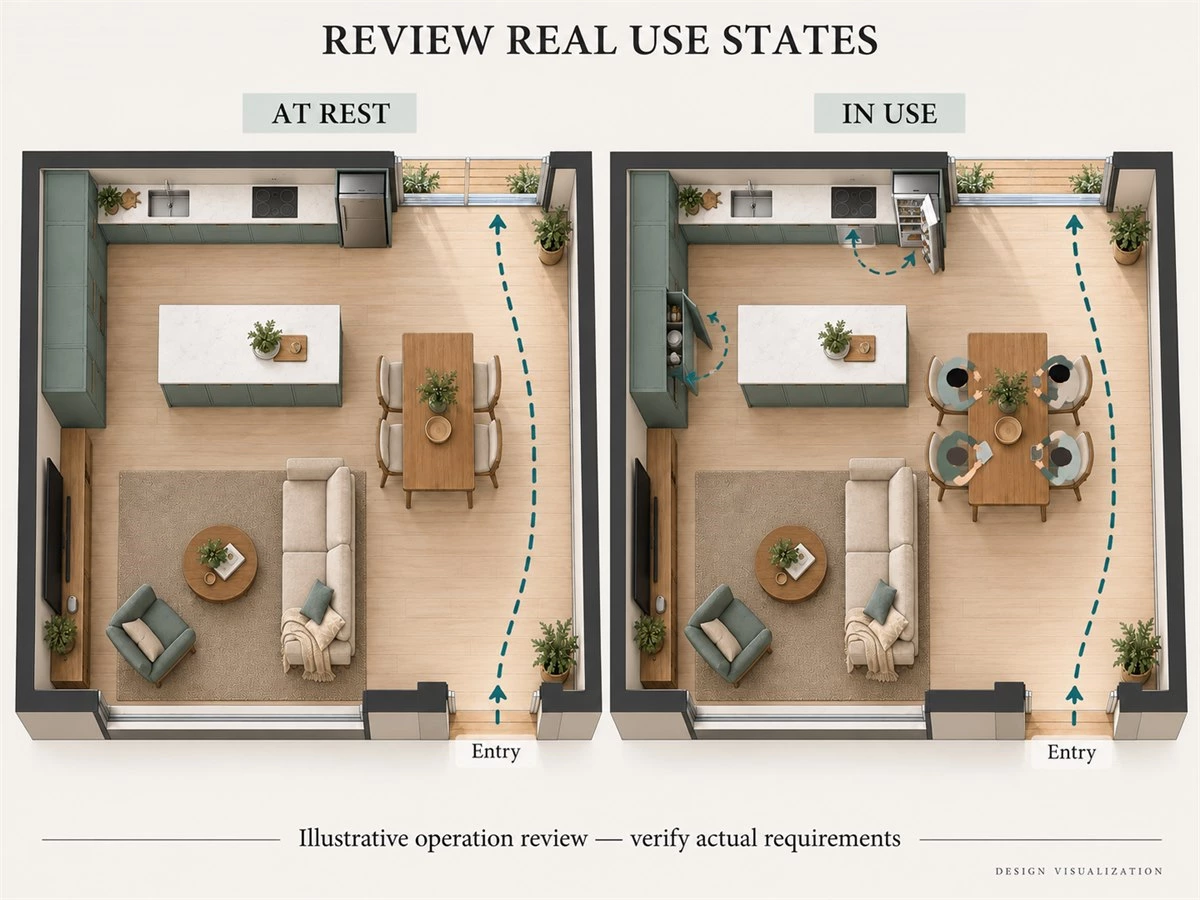
An empty-room plan is a starting point. Review normal occupied states before drawing conclusions about access, and confirm the relevant requirements against the actual furniture, products and project.
Trace the Main Routes Across the Public Area
Follow movement from the entrance to the table, sofa, kitchen, and adjoining spaces. In the illustrative room, review the connection from the front-right entrance toward the rear-right outdoor opening, plus the branches needed to reach each activity.
Identify where someone passing through would enter an active kitchen task or stand in front of storage. Compare alternative locations that reduce repeated interruptions. The fact that a line fits on a diagram does not verify that the real passage is suitable.
Show Dining Chairs and Casual Seating Occupied
Draw chairs in use and pulled back, not only tucked under the table. Check storage access during a meal and movement behind seated users. Where stools are proposed, show them too rather than counting only the island footprint.
If a cabinet cannot be used without asking a diner to move, decide whether that limitation suits the item’s access frequency. Frequently used storage may need a different position; occasional storage presents a different trade-off. Avoid treating all compartments as equally convenient.
Open Cabinet Fronts, Drawers and Equipment Doors
Show the relevant moving fronts together, including handle projection where it affects use. Test likely combinations: retrieving tableware while someone passes, clearing a meal near an open appliance, or accessing lounge storage beside an occupied armchair.
Use product information to confirm the actual operating requirements. A conceptual opening diagram identifies questions; it does not establish appliance compatibility or a universal clearance. Revise the arrangement when the real opening state conflicts with an essential task.
Recognize Decisions That Extend Beyond Cabinet Planning
A proposal to relocate equipment, alter a wall, or change service positions introduces responsibilities beyond cabinet appearance. Identify who assesses and confirms those conditions before relying on the arrangement.
An open-plan concept does not prove that a wall can be removed or equipment can be relocated. Keep the cabinetry proposal connected to confirmed site information and the relevant project parties, rather than using a perspective image as approval for wider work.
Keep Storage Useful from More Than One Viewpoint
Cabinetry for open-plan living is seen from several positions. Review appearance and access from those positions so that a good front elevation does not conceal an awkward side, back or working arrangement.
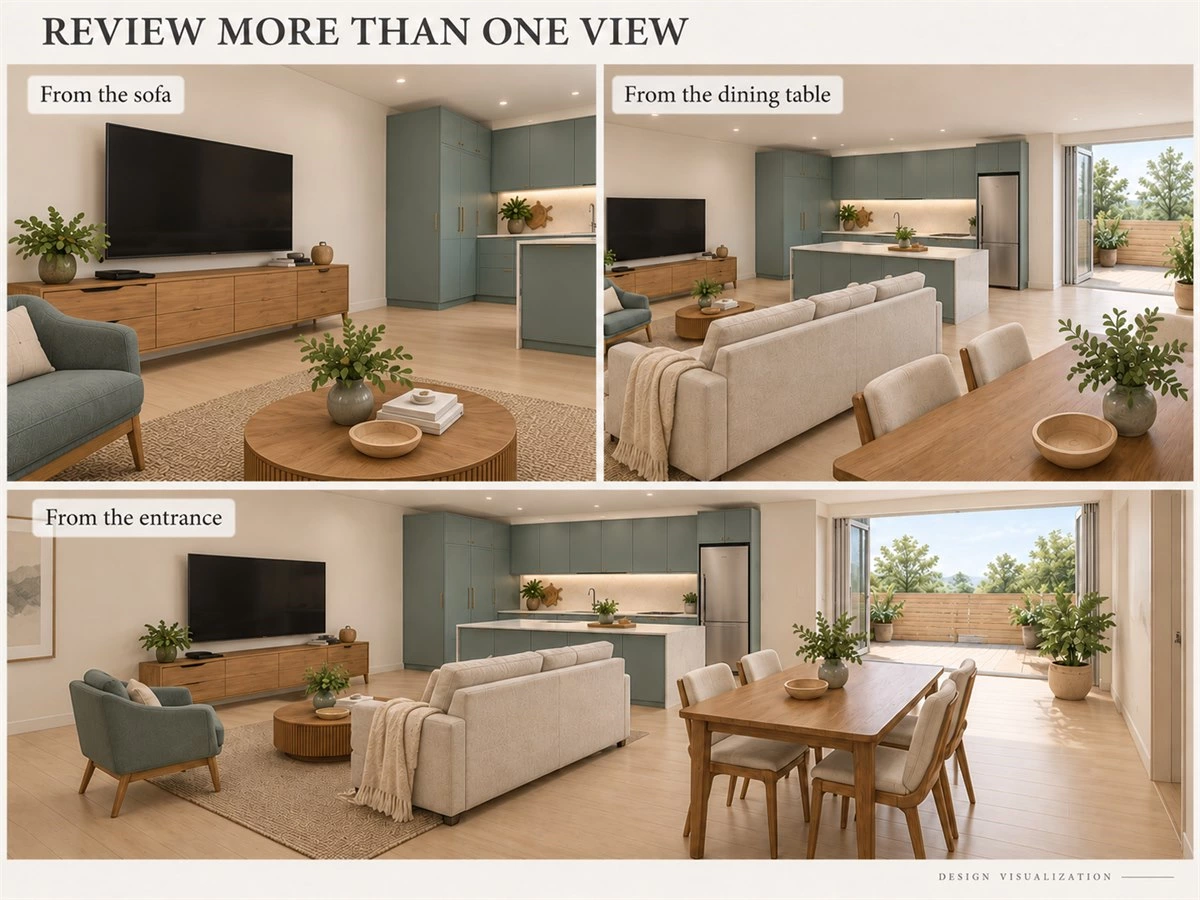
Review Views from the Sofa, Dining Table and Entrance
Use the same room model or plan to establish each view. Include exposed cabinet sides, backs and tops where they are normally visible. Compare a seated view with the view on arrival; a tall unit may have very different presence from those positions.
Mark which surface is intended to lead each composition and which supports it. If a cabinet is being used away from a wall, its visible rear needs a defined treatment rather than an assumption that a standard back will suit the room.
Balance Closed Storage with Selected Display
Give daily clutter a practical closed-storage location, then decide which objects the household wants to display. Consider how several display areas read together across the kitchen, dining and lounge. Each may look restrained alone while the shared view becomes busy.
Let the inventory and maintenance preferences guide the balance. There is no need to apply one open-to-closed ratio throughout the room. A quiet kitchen elevation can coexist with a selected dining display and a different media arrangement.
Plan Integrated Living Room Storage Around Actual Devices
List devices, connections, and replacement access. Confirm their ventilation and service requirements from the selected equipment rather than closing every compartment to achieve a uniform face. Identify how a cable, connection, or device can be reached later.
The outside composition and equipment arrangement need to work together. A closed rendering does not prove that a device can operate within the cabinet, and a different project’s photograph does not establish a suitable internal detail for your equipment.
Check the Everyday Reset
Walk through an illustrative after-dinner routine. Serving pieces return to their assigned location, table linens need a home, a game is put away near the lounge, and chargers should leave the coffee table without moving into a temporary pile beside the kitchen.
If tidying one zone consistently transfers belongings into another, revisit the allocation. A convenient modest compartment can serve daily life better than extra capacity at an inconvenient location. Test this routine against both layouts in the later comparison.
Connect Proportions and Materials Without Copying Every Detail
Kitchen, dining, and living cabinetry can share a clear visual relationship while retaining different functions. Select the connections that matter in the shared view, then let the individual tasks shape the details.
Repeat Selected Relationships Across Zones
A related wood tone, restrained finish, visible edge, or selected line can connect separate cabinet locations. Decide where it repeats and where it stops. A repeated detail is more useful when it explains the relationship between the zones rather than appearing everywhere without a purpose.
The open-plan integrated millwork product direction offers a relevant visual reference to discuss. It remains a product example; the storage tasks and room conditions for your home need their own assessment.
Allow Cabinet Heights and Interiors to Differ
Food storage, tableware and media equipment do not have identical requirements. A cabinet useful for one activity may have unsuitable internal proportions or access for another. Keep the functional brief visible while reviewing the outside composition.
Continuity can come from selected relationships even when heights, openings and interiors differ. Do not force every unit to match simply to produce an unbroken band. Review the combined elevation to decide which differences are intentional and understandable.
Review Materials in the Actual Public-Area Context
Place proposed references beside retained flooring, furniture, and relevant light conditions. Include exposed edges and side panels. A finish selected for the kitchen should also be considered from the lounge when both remain visible together.
For deeper palette decisions, use the whole house color scheme guide. Keep this review focused on the shared area: which surfaces connect it, which establish individual activities, and what actual samples are required before agreeing the result.
Compare Complete Layouts and Use a Relevant Case
Compare storage strategies on the same public-area brief. This makes the trade-offs visible without presenting a more spacious-looking drawing as proof of a better layout.
Establish One Shared Brief for Both Layouts
Use the rectangular illustrative room introduced earlier: kitchen rear-left, dining center-right, lounge front-left, entrance front-right, and outdoor opening rear-right. Keep the same preparation island, kitchen equipment, retained sofa, armchair, table, a nd four chairs in both options. Maintain the same openings and relevant service assumptions.
The common inventory includes cooking supplies, tableware, glassware, linens, games, and media accessories. Both retain a media-equipment position. This is a qualitative planning comparison, not the mountain-view project, an equal-capacity calculation, or a verified passage assessment.
Layout A — More Concentrated Storage
Assign cooking supplies and selected shared belongings to a larger kitchen-adjacent storage bank. Tableware, linens, games, and general items have designated sections there, while the lounge media unit continues to serve equipment. The dining edge has fewer additional storage pieces.
The benefit to test is a more concentrated storage composition and fewer separate cabinet locations. The compromise to test is the journey: retrieving a game or serving piece may bring someone toward the kitchen-adjacent area. Show which face opens toward shared access and whether retrieval interferes with working use.
Layout B — Storage Distributed by Activity
Reduce the shared storage bank while retaining the cooking requirements. Allocate tableware and linens to a dining-side sideboard and games to the lounge storage. Keep the island, equipment, media provision, and retained furniture unchanged. Every inventory category still needs a defined home.
This may shorten selected retrieval journeys, but the sideboard and lounge fronts create additional access points. Test the sideboard against occupied chairs and the route toward the outdoor opening. If the proposed pieces cannot accommodate the inventory, revise the option rather than claiming success by leaving items out.
Compare the Trade-Offs Under the Same Conditions
| Decision | Layout A: concentrated storage | Layout B: activity-based storage | What to check |
|---|---|---|---|
| Daily access | More items grouped in a kitchen-adjacent bank | Items distributed closer to their activity | Frequency and path of retrieval |
| Cabinet presence | A larger concentrated composition | Several task-related cabinet locations | Views from entrance, table and sofa |
| Dining use | Tableware retrieved from the shared bank | Sideboard access near the table | Occupied chairs, fronts and passage |
| Lounge use | Games retrieved from the shared bank | Games assigned near seating | Furniture use and inventory fit |
| Coordination | More tasks rely on one cabinet location | More locations and visible interfaces to resolve | Openings, edges and equipment access |
Choose the arrangement that fits the household’s priorities after reviewing both access and views. A hybrid may be more useful: retain concentrated occasional storage while placing only frequently used dining or lounge items nearby. That revision should remain traceable to the same inventory and activities.
Read the Mountain-View Residence as a Spatial Reference
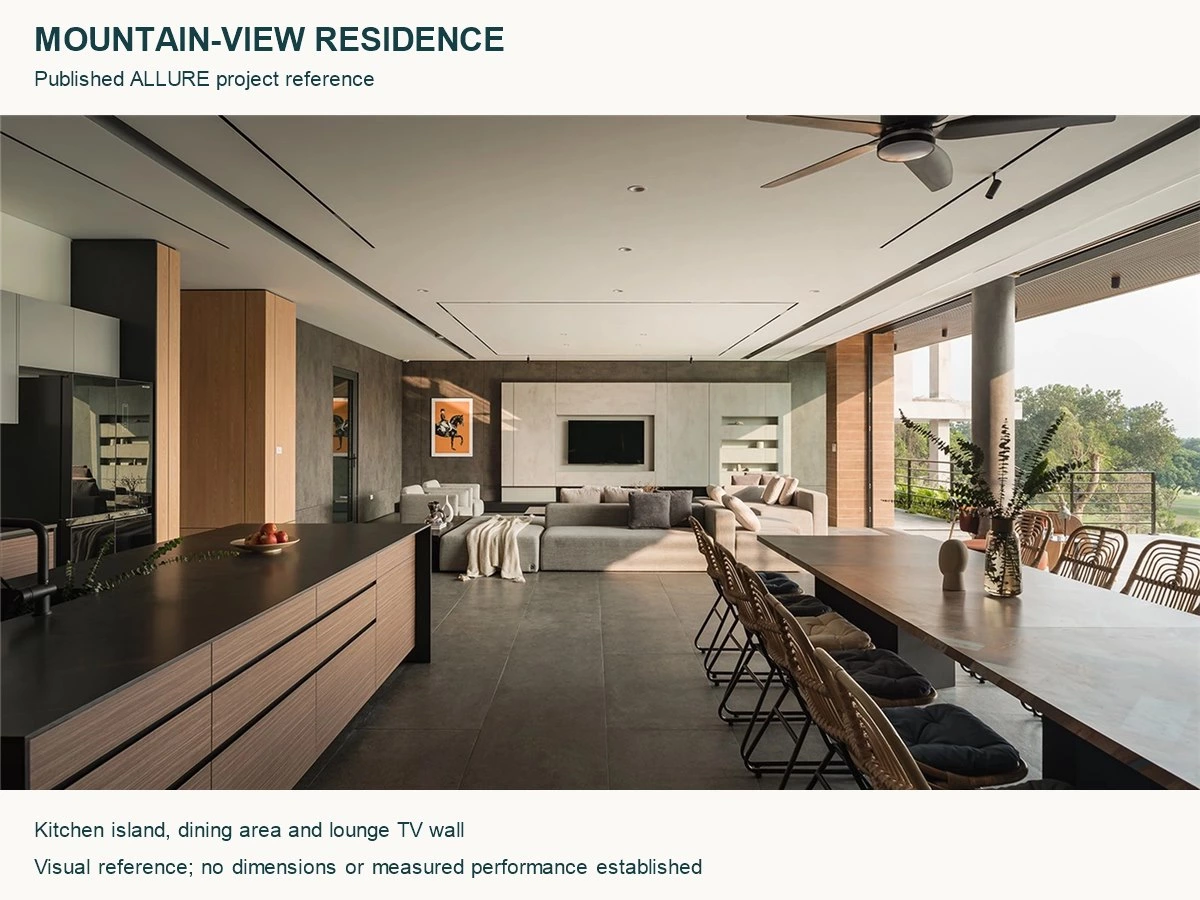
The published mountain-view residence describes a connected living, dining, and kitchen area with a poolside outlook. Its cabinet scope identifies a TV wall, island, storage,e and display. The page also describes dining-side storage within that shared environment.
Use the reference to see distinct cabinet roles within one public area, rather than treating the kitchen as the only organizing element. It does not establish the dimensions, costs,ts or performance of the illustrative layouts above. Keep its source imagery separate from those concepts and avoid extending its documented scope to every item visible.
FAQs About Cabinetry for Open-Plan Living
Does an Open-Plan Living Area Need a Cabinet Divider?
No. Furniture placement, activity locations, and wall-side storage can establish zones. Consider a divider when it provides a needed function and works with the complete arrangement. Its position, access, visible surfaces, and support need their own assessment.
Should Kitchen, Dining and Living Cabinets Use the Same Finish?
They can share selected finishes or details without being identical. Review the combination from the main viewpoints and beside retained furniture. Let individual configurations follow their tasks, and confirm actual material references rather than relying only on screen images.
Is an Island Always the Best Way to Connect the Zones?
No. Its usefulness depends on the room, preparation needs, dining arrangement, and surrounding movement. Compare its specific tasks with the alternatives. A retained dining table may already serve the social function, while a different kitchen arrangement may suit some rooms better.
Can I Keep My Existing Dining Table and Sofa?
Yes, include them in the brief from the beginning. Record their actual dimensions, intended positions, and operating states, including occupied chairs or table extensions. Test the cabinet proposal around those conditions rather than assuming the furniture will be replaced later.
How Can Open-Plan Storage Hide Clutter Without Closing the Room?
Assign everyday items to convenient closed storage, then select display where it has a purpose. Review the whole area so additional cabinets do not simply obstruct a route or view. The useful balance depends on the inventory, activities, and maintenance preferences.
What Information Helps Assess an Open-Plan Cabinet Proposal?
Provide a complete public-area plan, retained furniture positions, equipment information, storage inventory,y and household activities. Add photographs from the entrance, table,le and seating. Actual dimensions, operating requirements, and site conditions still need confirmation before a proposal is finalized.
Plan the Connected Area Around Everyday Use
Start with the activities, retain the furniture that works, and give every storage position a task. Compare complete layouts, then check occupied routes and views from more than one location. This creates a clearer brief than beginning with a single cabinet wall.
Explore whole-home cabinetry options in relation to that brief. Planning a connected kitchen, dining area and lounge? Share your public-area plan with ALLURE, together with furniture positions, equipment information, everyday belongings and household activities. Discuss a suitable cabinetry scope, with relevant interfaces and project responsibilities confirmed for your home.