A bathroom vanity plumbing layout is successful only when the basin, drain, water supplies, drawers and future service access work together. A cabinet can look spacious in a front elevation yet lose its upper drawer—or block a shutoff valve—once the actual trap and pipe connections are installed.
For a custom vanity, the first question is not simply “Where should we cut a hole in the back?” It is which basin and fittings will be used, where the existing or proposed services sit, what the drawer boxes need to clear during their full travel, and how a plumber will reach the connections later. Those answers determine whether a U-shaped drawer, shallow drawer, side storage or non-opening front is appropriate.
This guide is for designers, builders, renovators and project buyers approving cabinetry before production. It explains how to map a complete plumbing clearance zone, compare under-sink drawer arrangements, plan cutouts and preserve access. It does not offer one rough-in dimension for every vanity. Final locations and connections must follow the selected product instructions, verified site conditions and applicable local plumbing requirements.
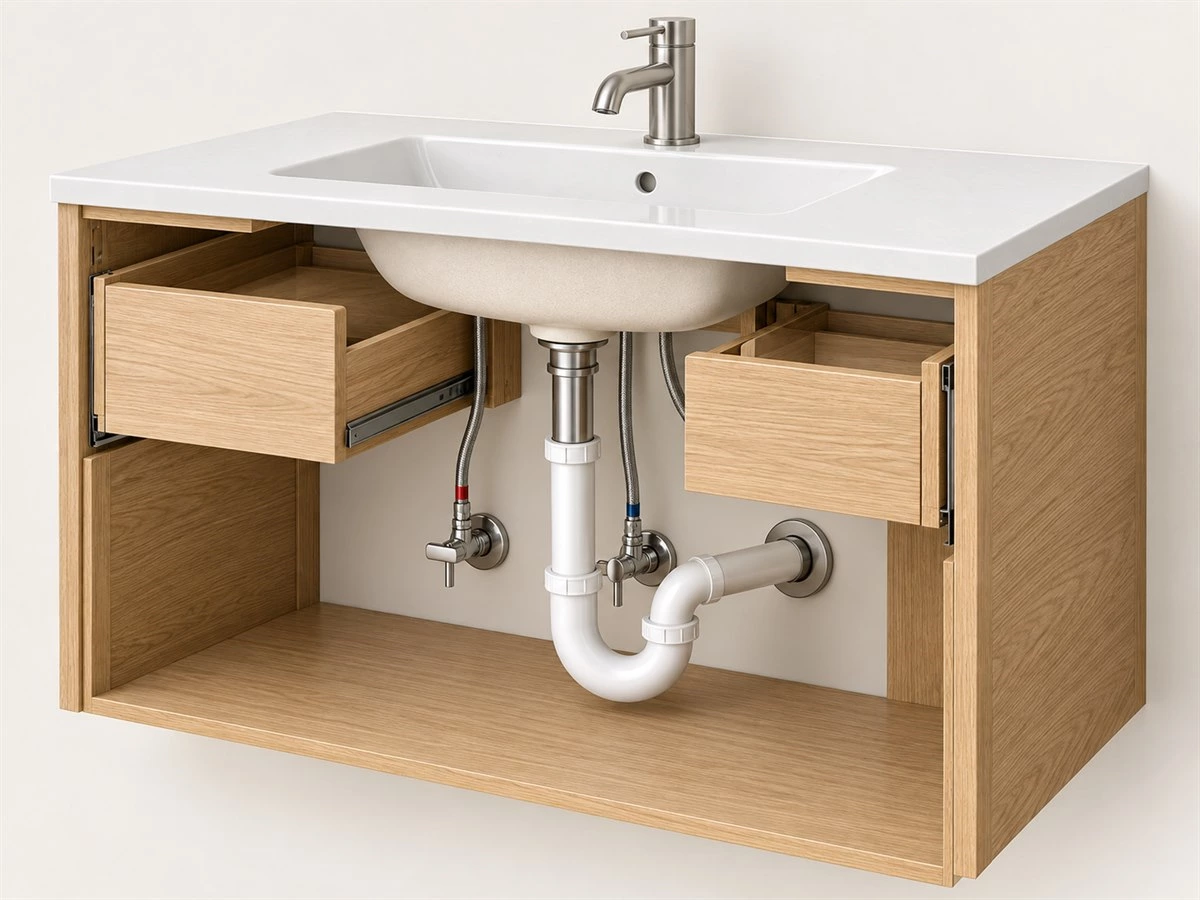
Start With the Exact Basin and Plumbing Components
“Standard sink” is not a usable production instruction. Two basins of similar width can have different bowl depths, drain positions and mounting details. A drain or trap that looks compact in a rendering may occupy more space once connectors, valves and the route to the wall are included. Select the actual products—or clearly mark the decision as open—before finalizing the cabinet interior.
Record the Basin Model, Bowl and Countertop
Keep the basin manufacturer's model and specification with the vanity drawing. Identify whether it is a vessel, inset, undermount or integrated basin; record the bowl's underside and drain location as they relate to the finished top. For a double vanity, do this for both basins rather than assuming the second is a mirror image. Confirm countertop material, thickness, cutout, overhang and any support or fixing that enters the cabinet space.
A basin centred visually on the front may not have its waste outlet in the most convenient position for the proposed drawers. The cabinet plan and section should reflect the real fitting, not only the ideal centreline on the elevation.
Identify the Drain, Trap and Water Supplies
Record the intended waste assembly, trap or siphon, drain route, hot- and cold-water supply positions and shutoff-valve locations. Include faucet hoses and other fittings that will hang below the basin. Note whether the services come from the wall or floor and which positions have been measured on site. An existing pipe location should not be moved on a drawing without the relevant plumbing trade confirming that change.
Manufacturer information illustrates why this must be model-specific. A Robern vanity specification sheet shows a defined plumbing cutout area and distinct plumbing-drawer options for its particular system. Those dimensions are useful for that model, not a default for unrelated custom vanities.
Confirm Finished Site Conditions
Record the finished wall surface, floor level, tile or wall-panel build-up and the structural wall condition if the vanity will hang from it. A pipe measured before tiling may sit differently relative to the final cabinet back. A floating vanity must also be coordinated with its fixing method, not treated as a floor-standing cabinet with the plinth removed.
Before production, identify which dimensions come from a site survey, which come from product documents and which remain provisional. The person approving the cabinet should be able to tell the difference at a glance.
Draw a Complete Vanity Plumbing Clearance Zone
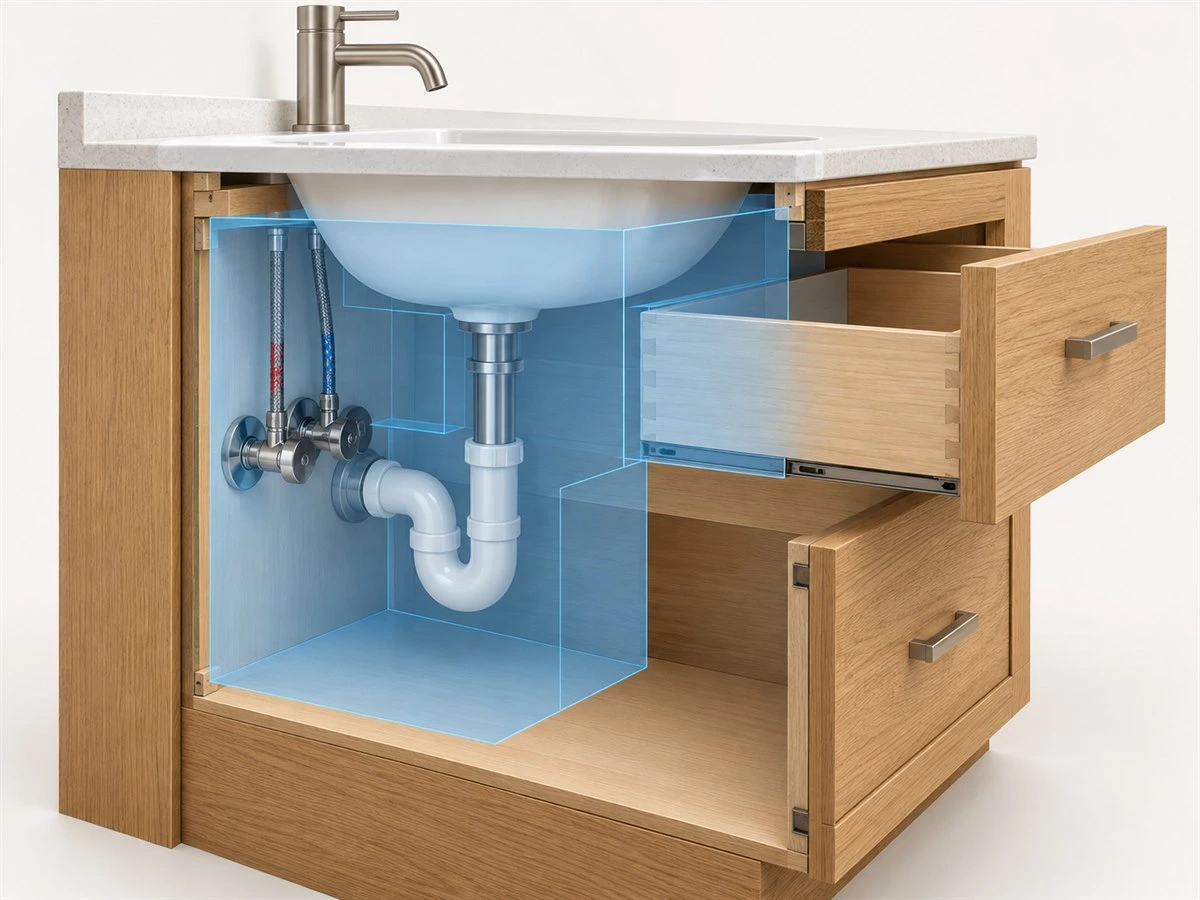
A single circular opening around the waste pipe is not a complete vanity plumbing clearance plan. The cabinet has to clear the underside of the basin, the trap body, supply connections, valve handles and any space required to assemble, inspect or disconnect the fittings. The drawer must clear that zone when closed, when moving and when removed for service.
Compare Plan, Elevation and Section
A plan view shows horizontal positions and the distance of plumbing from side panels. A front elevation locates basins, cabinet divisions, drawer fronts and wall outlets. A vertical section shows the bowl depth, top construction, trap, drawer box and available depth. These views should carry the same basin model, cabinet code and drawing revision.
Review the most crowded point in the section: often the upper drawer passing below the bowl and in front of the trap. A front elevation can hide that conflict because the finished drawer face covers the internal components.
Include Connectors, Valves and Working Space
Allow for the components actually selected, including supply hoses, couplings and shutoff-valve operation. The required clearance is not just the outside diameter of one pipe. A fitting that can be seen through a cutout may still be impossible to reach with a hand or tool. Ask the installer to review the proposed access before the cabinet back or drawer boxes are fabricated.
Check the Drawer Through Its Full Travel
Plot the internal drawer box, sides, back, runners, dividers and handles—not only the decorative front. Pull-outs and soft-close hardware may occupy space beyond the visible drawer opening. Check the drawer at closed and extended positions, and confirm that it can be removed according to its hardware instructions without pulling against a hose or hitting a valve.
Do not substitute a generic online “clearance number” for this exercise. The correct envelope depends on the basin, plumbing components, drawer system and installation method selected for the project.
Compare Under-Sink Drawer Designs Before Choosing One
The best under sink drawer design does not maximize an empty cabinet's theoretical storage volume. It creates useful compartments after the real plumbing, hardware and service method are accounted for. A design that saves a little central drawer space but prevents the trap from being reached is a poor trade.
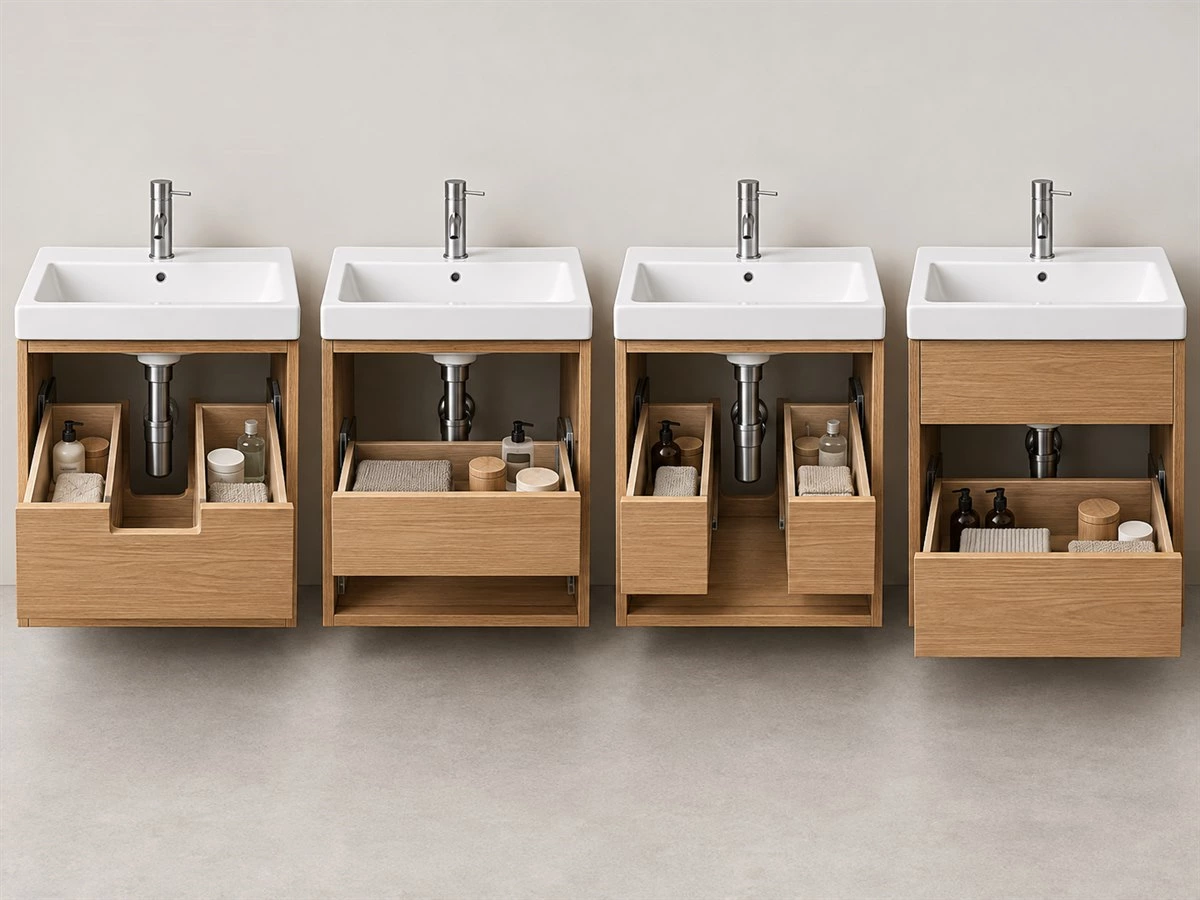
| Layout | How It Clears Plumbing | Storage Trade-Off | Approval Check |
|---|---|---|---|
| U-shaped drawer | A central notch surrounds the selected plumbing zone | Centre area is lost but side compartments remain | Can the full trap, valves and drawer movement fit inside the notch? |
| Shallow or shortened drawer | Drawer box stops before the rear or upper plumbing zone | Reduced depth or height | Is the remaining compartment useful for intended items? |
| Side drawers or divided storage | Storage is placed beside the services | Extra partitions can reduce flexibility | Do runners and divider panels remain clear of fittings? |
| False drawer front | Upper front remains non-opening | No upper-drawer storage | Has the buyer accepted the actual storage layout? |
| Approved rear-routed system | Compatible basin and fittings route services behind usable storage | Product selection and rough-in options may be constrained | Do the selected products and site conditions support this exact arrangement? |
U-Shaped Drawers
A U-shaped drawer can keep storage to either side of a central trap. The notch must be designed around the actual plumbing envelope, including fittings that are not perfectly centred. Confirm how much usable width remains, whether containers fit the side compartments and whether the drawer box can be built and cleaned reliably. A U shape is not automatically the best option when a basin bowl is deep or services are spread across a wide area.
Shallow or Shortened Drawers
A shallower upper drawer can avoid services while keeping a simple rectangular drawer box. The trade-off is reduced internal space. Test it against the client's intended storage—small toiletries, towels, cleaning products or other items—rather than approving the front elevation alone. Where the drawer stops short, keep the plumbing behind it accessible through an agreed removal method.
Divided Side Storage
Separate side drawers or storage bays can make sense when a central basin and pipe route consume the middle. The cabinet partitions, runners and fixing points then become part of the clearance check. A divider installed close to a supply valve may create a service problem even if the drawer itself avoids the trap.
False Fronts and Lower Storage
Where the upper zone cannot reasonably contain a working drawer, a fixed front may preserve the intended appearance while lower drawers or side cabinets provide storage. Label the front as non-opening on the drawing and explain the storage loss before approval. A buyer should not discover at handover that a prominent “drawer” is decorative.
Rear-Routed Plumbing With Compatible Products
Some purpose-designed basin and waste combinations route piping behind a more complete drawer. That can be useful, but it is a feature of a coordinated product system, not proof that every vanity can have a full-depth drawer. For custom work, ask the supplier to document the selected basin, trap and drawer as one compatible arrangement, then confirm the site rough-in and local installation requirements before adopting the concept.
Single-Basin and Double-Vanity Plumbing Layouts
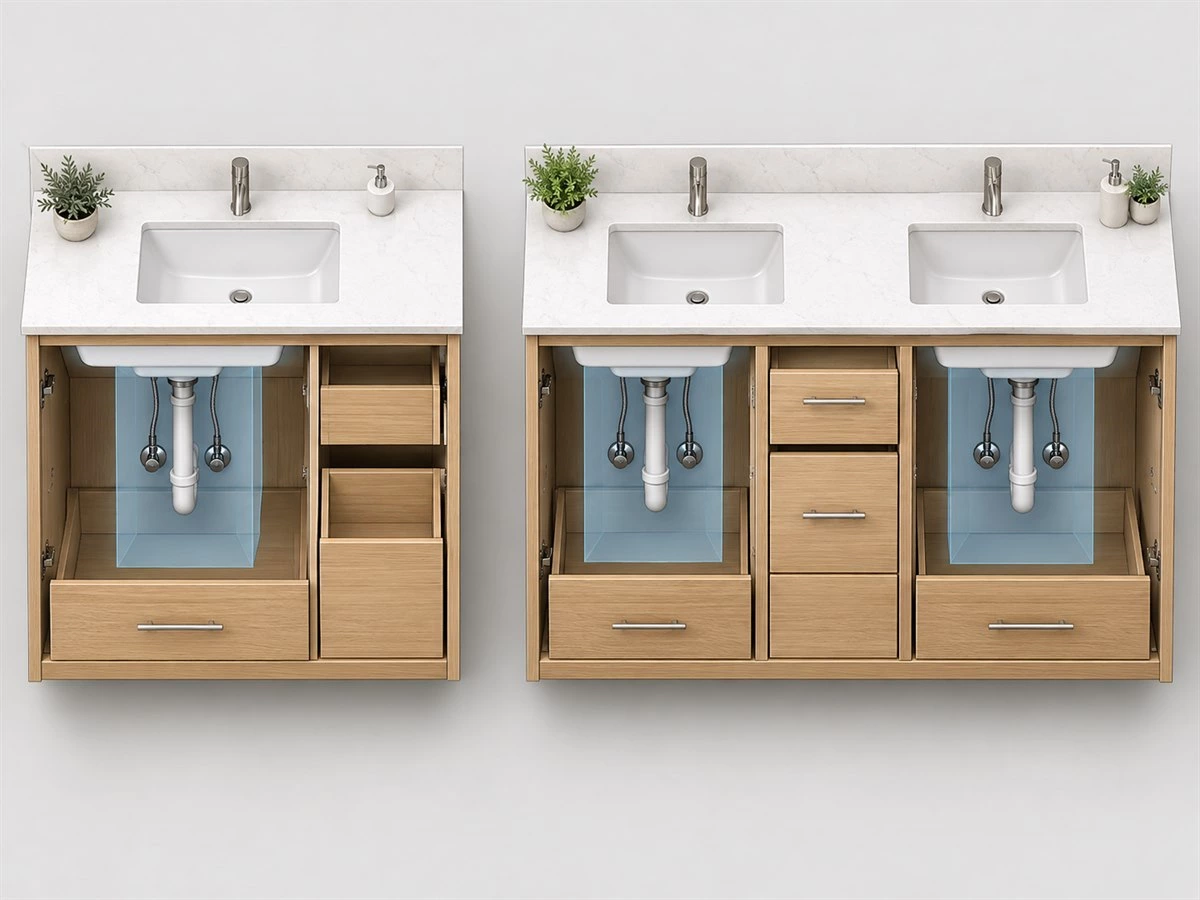
A single basin is not necessarily simple, and a double vanity is not merely two identical copies. Sink placement, bowl size, cabinet modules and the existing drain positions determine how much storage can fit between the fixtures.
Single Basin: Confirm the Actual Drain Position
Begin with the basin location on the countertop and the outlet beneath it. A visually centred basin may still need an offset connection or a trap that occupies the space behind a planned drawer. If the design proposes moving the basin or waste route to gain storage, have the plumbing trade confirm feasibility before changing cabinet dimensions.
Double Vanity: Map Two Complete Service Zones
Show both bowls, drains, traps, supply sets and valves. Check whether the middle cabinet module is genuinely free for storage or needed for connections and access. The two basins may be different distances from walls, mirrors or partitions, so the available drawer layouts may not be perfectly symmetrical.
Readers planning overall basin spacing and vanity proportions can consult the ALLURE double vanity dimensions guide. This article addresses the next technical layer: what happens inside the cabinet after the basin positions are chosen.
Coordinate Countertop Openings and Cabinet Divisions
Do not approve the countertop cutout, drawer modules and plumbing locations as separate decisions. The basin fixing, countertop joints, cabinet partitions and drawer widths must be shown on one coordinated drawing set. If a late basin change shifts the drain or enlarges the bowl, review the affected cabinet modules before production continues.
Wall-Hung and Floor-Standing Vanity Differences
Wall-Hung Vanities
A floating vanity must be supported by a suitable wall and fixing system. The mounting structure, basin load and cabinet construction need project-specific review; pipe clearance alone does not establish whether the installation is suitable. Because the floor below is visible, a poorly coordinated pipe route can also be more conspicuous. The plumbing outlet, back panel and bottom line should be resolved together.
For the visual and ergonomic height decision, see the floating bathroom vanity height guide. Height planning is related to, but separate from, the pipe and drawer clearances discussed here.
Floor-Standing Vanities
A floor-standing unit introduces a base, legs or toe kick that may meet existing floor services, skirting or an uneven finished floor. Check whether the lower cabinet components restrict access to a rear connection. A floor-standing cabinet may conceal pipes more easily, but concealment should not make fittings unreachable.
Do Not Choose a Plumbing Route From Appearance Alone
Neither floating nor floor-standing style authorizes an arbitrary trap or drain position. The selected basin and fittings, site survey and local trade requirements determine what can be installed. If the preferred cabinet arrangement conflicts with those conditions, revise the layout or product selection and document the decision.
Design Plumbing Cutouts Without Creating a Cabinet Problem
Bathroom vanity plumbing cutouts should be large enough for the approved components and installation method, but their position must also respect cabinet connections, drawer runners and the intended appearance. The detail should identify which opening is factory-made and which, if any, is left for site verification.
Factory Cutouts Versus Site Cutouts
Where the final outlet position has been accurately measured and the selected products are fixed, the factory can work from an approved dimensioned cutout. If the site condition remains uncertain, a planned site-cut strategy may be necessary. “Cut to fit” is not sufficient by itself: record the affected panel, permitted cutting zone, edge treatment and the party responsible for checking the final result.
Back Panels, Shelves and Structural Partitions
A wide opening might clear the pipe but remove an important connection or expose an unfinished edge. Review the cabinet section before cutting through a back panel, shelf or divider. If the outlet lands near a drawer runner, hinge plate or cabinet fixing point, the drawing needs a revised solution rather than an improvised opening on site.
Protect Exposed Panel Edges
Bathroom cabinetry is used near water. Cut edges and penetrations should receive a treatment suitable for the specified panel and its environment. A decorative cover plate may make an opening look neat, but it does not replace appropriate edge protection or properly installed plumbing. The cabinet supplier should define its panel detail, while the qualified plumbing trade remains responsible for the connections.
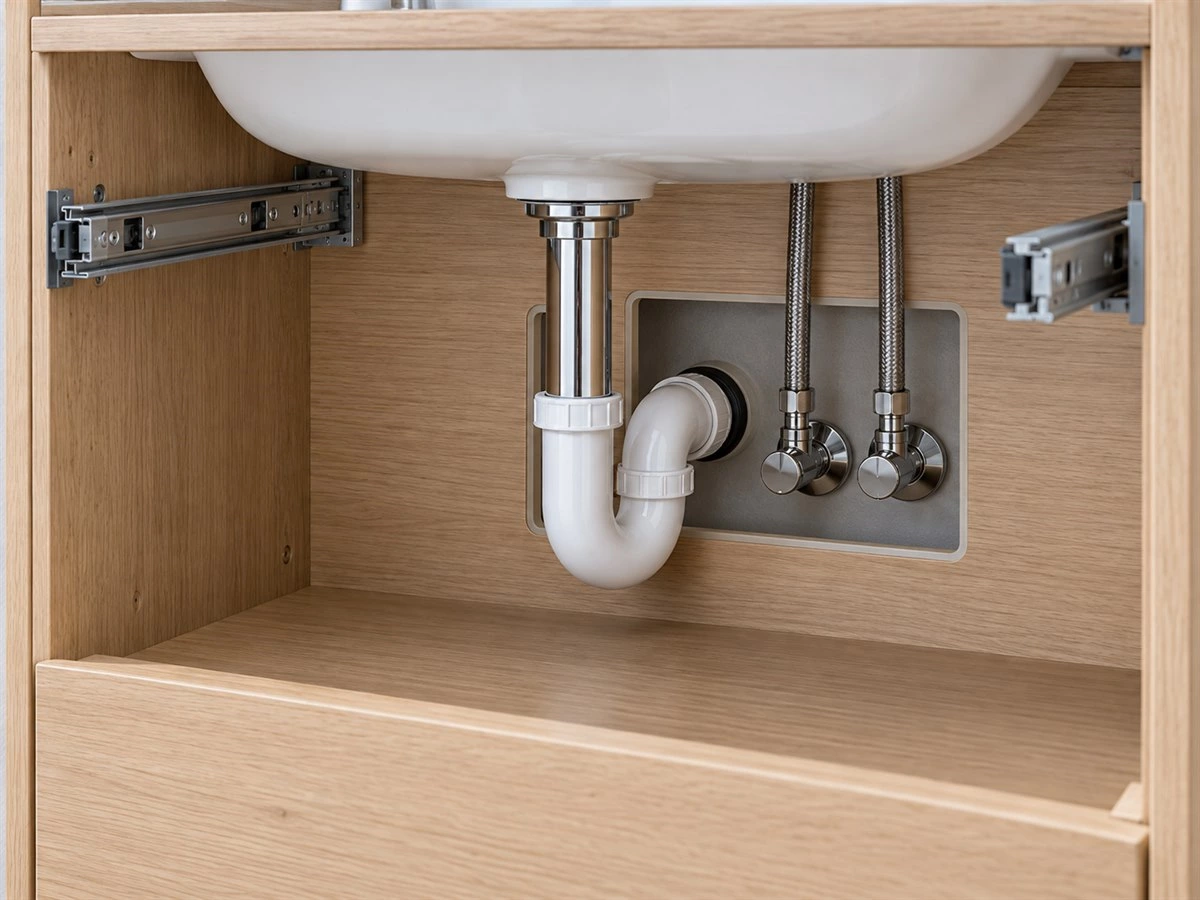
Keep the Trap and Valves Accessible After Installation
Vanity plumbing access is easy to overlook because a completed front elevation shows closed drawers. Yet traps can require inspection, valves may need to be operated and connections may need attention long after handover. The service method should be demonstrated on the drawing and checked with the selected hardware.
Reach the Connections, Not Just See Them
Can a person operate the shutoff valves? Is there space to inspect or remove the trap according to the selected product instructions? Can a connection be reached without cutting away a fixed divider? Ask those questions before approving a narrow access slot or a deep drawer that covers the entire rear of the cabinet.
Specify Removable Components
If access depends on removing the upper drawer, identify the drawer hardware and its release method in the project handover record. Some manufacturer installation instructions explicitly include drawer removal and reinstallation as part of accessing the basin or fittings; Duravit's instructions for one vanity system are an example, not a universal procedure for all drawers. Where an access panel is proposed, confirm how it is opened and replaced without damaging the finish.
Check for Water and Damage at Handover
The plumbing professional should test the installed connections using the appropriate procedure. The cabinet handover review should separately check for visible moisture, damaged cut edges, drawer interference, unstable panels and inaccessible valves. Record any issue with the room name, cabinet code, photographs and the responsible follow-up. Do not assume a dry cabinet at first use proves every connection will remain sound indefinitely.
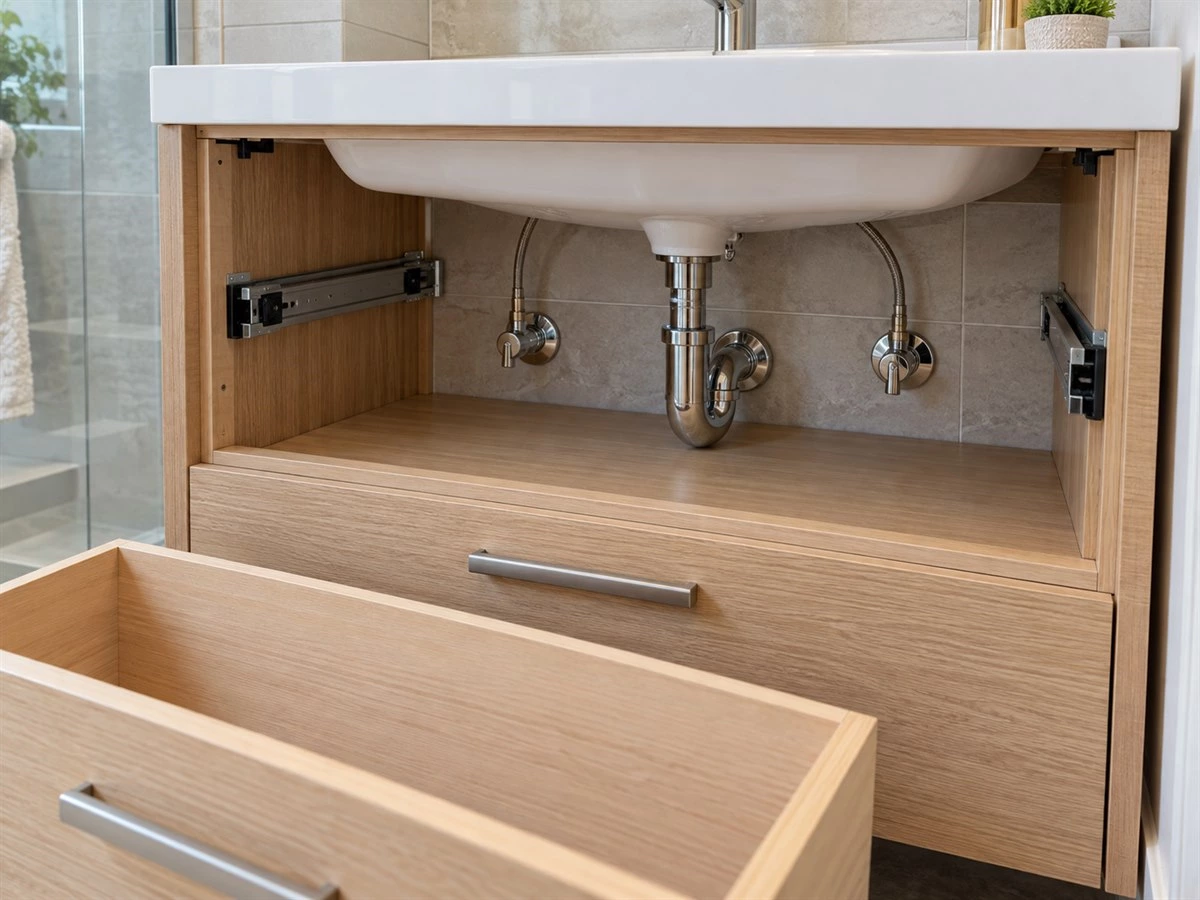
Pre-Production Vanity Plumbing Coordination Checklist
This checklist links each decision to an approval record. Replace provisional notes with the selected model and measured site information before releasing the affected cabinet parts for production.
| Item | What Must Be Confirmed | Record or Evidence |
|---|---|---|
| Basin | Exact model, bowl underside and drain position | Manufacturer specification and approved selection |
| Countertop | Material, thickness, opening, fixing and cabinet interface | Approved countertop detail |
| Drain and trap | Selected fittings, route and assembly zone | Product information and cabinet section |
| Water supplies | Measured positions, valve locations and access | Site survey and elevation |
| Drawer system | Box dimensions, runners, dividers and full movement | Plan, section and drawer detail |
| Cutouts | Location, cutting responsibility and edge treatment | Dimensioned back-panel or shelf detail |
| Service access | How fittings will be reached or drawers removed | Access note and hardware instructions |
| Cabinet support | Wall fixing or floor/base condition | Installation detail and site confirmation |
| Revision | Latest coordinated drawing and open decisions | Approval record with date and responsible party |
Before Fabrication
Confirm fixture models, finished site dimensions, the plumbing route, drawer choice and the cutout strategy. Check the vanity floor plan, front elevation and section together. If a basin or drain product is not yet selected, mark the associated drawer and cutout dimensions as unapproved rather than hiding the assumption. The cabinet shop drawing checklist provides a broader framework for keeping cabinet codes, dimensions and revisions consistent.
Before Installation
Recheck the actual site outlets against the approved drawing. Verify that the finished wall and floor conditions, selected fixtures and cabinet parts still match the information used for fabrication. If they do not, document the conflict and agree on the correction before cutting or fixing the vanity.
At Handover
Operate every drawer and door, confirm access to the agreed plumbing points, inspect visible cabinet finishes and record the condition with photographs. Keep product documents and drawer-removal instructions with the project handover information.
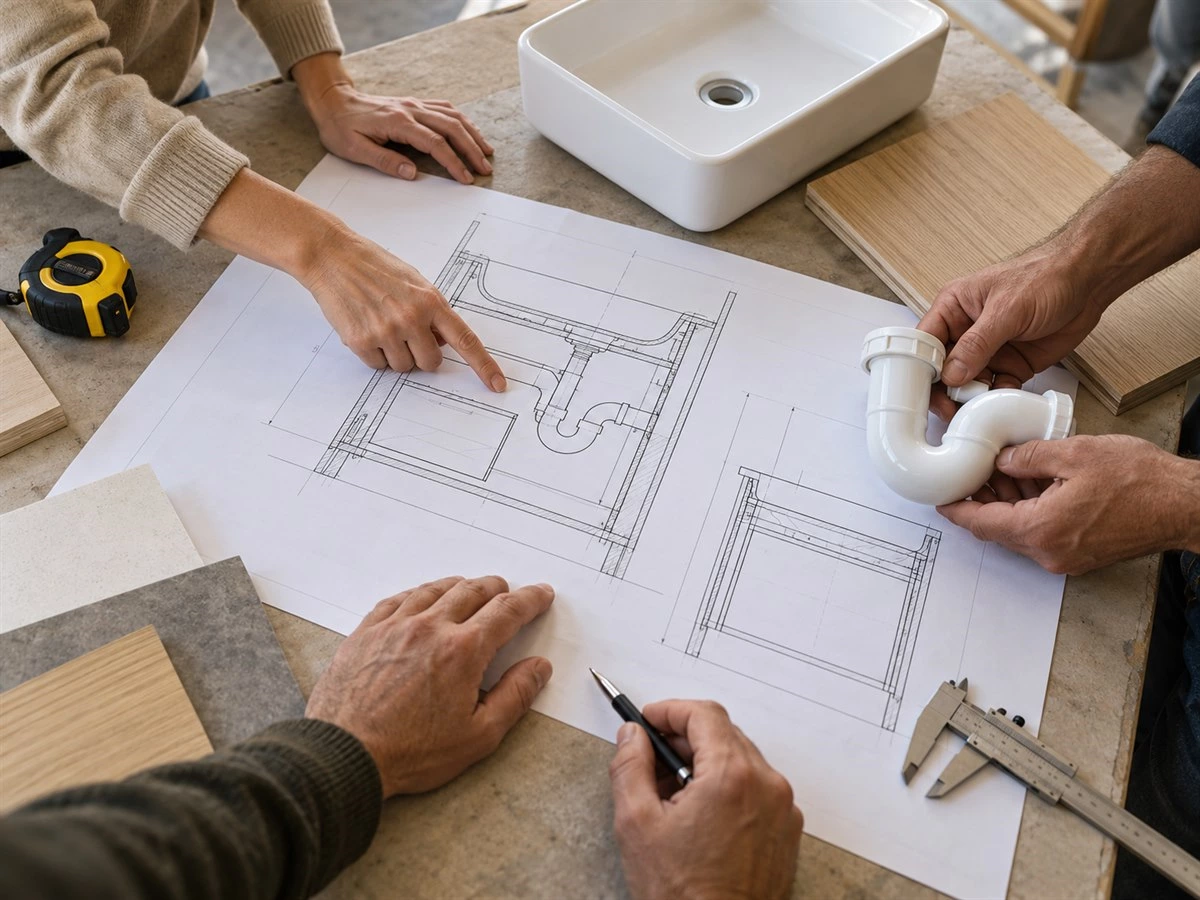
Common Bathroom Vanity Plumbing Layout Mistakes
- Choosing the drawer before the basin: The selected bowl and trap may occupy the proposed storage zone.
- Drawing one pipe hole instead of an access zone: Connections, valves and service movement need more thought than the pipe outline.
- Assuming all compact fittings are interchangeable: A rear-routed or shallow trap must be compatible with the selected basin and installation method.
- Ignoring full drawer travel: A drawer that closes empty may still hit plumbing when extended, loaded or removed.
- Blocking shutoff valves: Concealed fittings should remain operable without destructive cabinet work.
- Using generic rough-in dimensions: Product-specific documents and measured site conditions should control the layout.
- Leaving site cuts undefined: The affected panel, cutting zone and edge protection need an agreed detail and responsible party.
- Separating countertop and cabinet approvals: A late basin or top change can alter the plumbing clearance and drawer construction.
- Confusing appearance with serviceability: A clean front elevation does not prove the trap can be reached or a drawer can be removed.
Frequently Asked Questions
How much clearance does bathroom vanity plumbing need behind a drawer?
There is no reliable universal clearance for every vanity. It depends on the exact basin, waste assembly, trap, supply valves, connectors, drawer box and hardware. Plot the complete selected components in a plan and section, then have the responsible trades review the proposed installation and service access.
Can a vanity have full-depth drawers under the sink?
Some coordinated basin and waste systems allow more complete drawer storage by routing the plumbing behind it. That result cannot be assumed for a different basin, drain or wall outlet. Confirm the selected product instructions and test the actual drawer travel before approving a full-depth design.
Is a U-shaped drawer better than a false drawer front?
Neither is always better. A U-shaped drawer may provide useful side storage when the selected plumbing fits within its central opening. A false front can be more practical when the bowl or service area leaves insufficient space for a functional upper drawer. Show the real storage gained or lost in the approval drawing.
Where should the bathroom vanity plumbing cutout go?
Locate it from the approved basin and trap information and the verified site outlets, while protecting important cabinet connections and drawer hardware. The cutout should be dimensioned or assigned a controlled site-verification zone. Do not use one default cutout location for every cabinet.
Who confirms the plumbing route: the plumber or the cabinet supplier?
The plumbing trade confirms the connection requirements and actual service locations. The cabinet supplier incorporates those confirmed conditions into a buildable cabinet and drawer detail. The designer or project lead should coordinate the combined drawing and record the final approval.
How can the trap remain accessible after the vanity is installed?
Provide reachable clearance and, where needed, a removable drawer or access panel. Check the selected hardware's removal method and keep the instructions with the handover documents. Access should be tested with the actual cabinet arrangement, not only indicated by a symbol on a drawing.
Approve the Plumbing, Storage and Service Plan Together
A dependable bathroom vanity plumbing layout follows a clear sequence: choose the basin and fittings, measure the site, draw the full clearance envelope, compare realistic drawer options, define cutouts and service access, and approve one coordinated drawing revision. That process gives the user storage that works while leaving the selected plumbing installable and maintainable.
Planning a custom bathroom vanity? Share the basin model, faucet and waste details, site plumbing measurements, proposed countertop and storage priorities with the ALLURE team before approving production drawings. The sooner those decisions are coordinated, the easier it is to protect both the intended design and the useful space inside the cabinet. For a broader bathroom-planning sequence, see the bathroom design guide before construction.